
2017
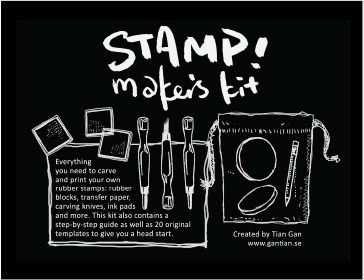
Stamp Maker’s Kit
Product development and design for a tool and instruction kit that inspires skill learning and creative exploration.
Key Skills

Overview
I had been working as a freelancing printmaker for 4 years, making and teaching people to make linocuts and rubber stamps.
Since traditional printmaking scene in Sweden is rather small, I had to source the tools and materials from China, Japan, UK, Sweden and USA. When my students and people who saw my work online asked for tips about where to buy them, they usually got a rather long and cumbersome list, making the threshold of trying the new craft unnecessarily high.
I identified the need and the gap in the market and decided to create a product that made it easy to get started with a new form of creative exploration.

Participants of my workshop using tools I sourced from all over the world
Challenges
Since this was a one-woman project and the final product would be directly connected with my personal brand, I had to make sure that every stage of the product development was up to my standards.
To ensure that I could design a product backed by my experience in printmaking and pedagogy and suitable for a wide range of potential customers, I needed to understand their wants and needs.
Since I wanted to include all the tools and materials one needed to get started to relief printmaking, it also meant that I needed to source the them from several supplies and coordinate the process.
Timeline
To set up the structure for this project, I defined the steps of my work process through making this timeline.

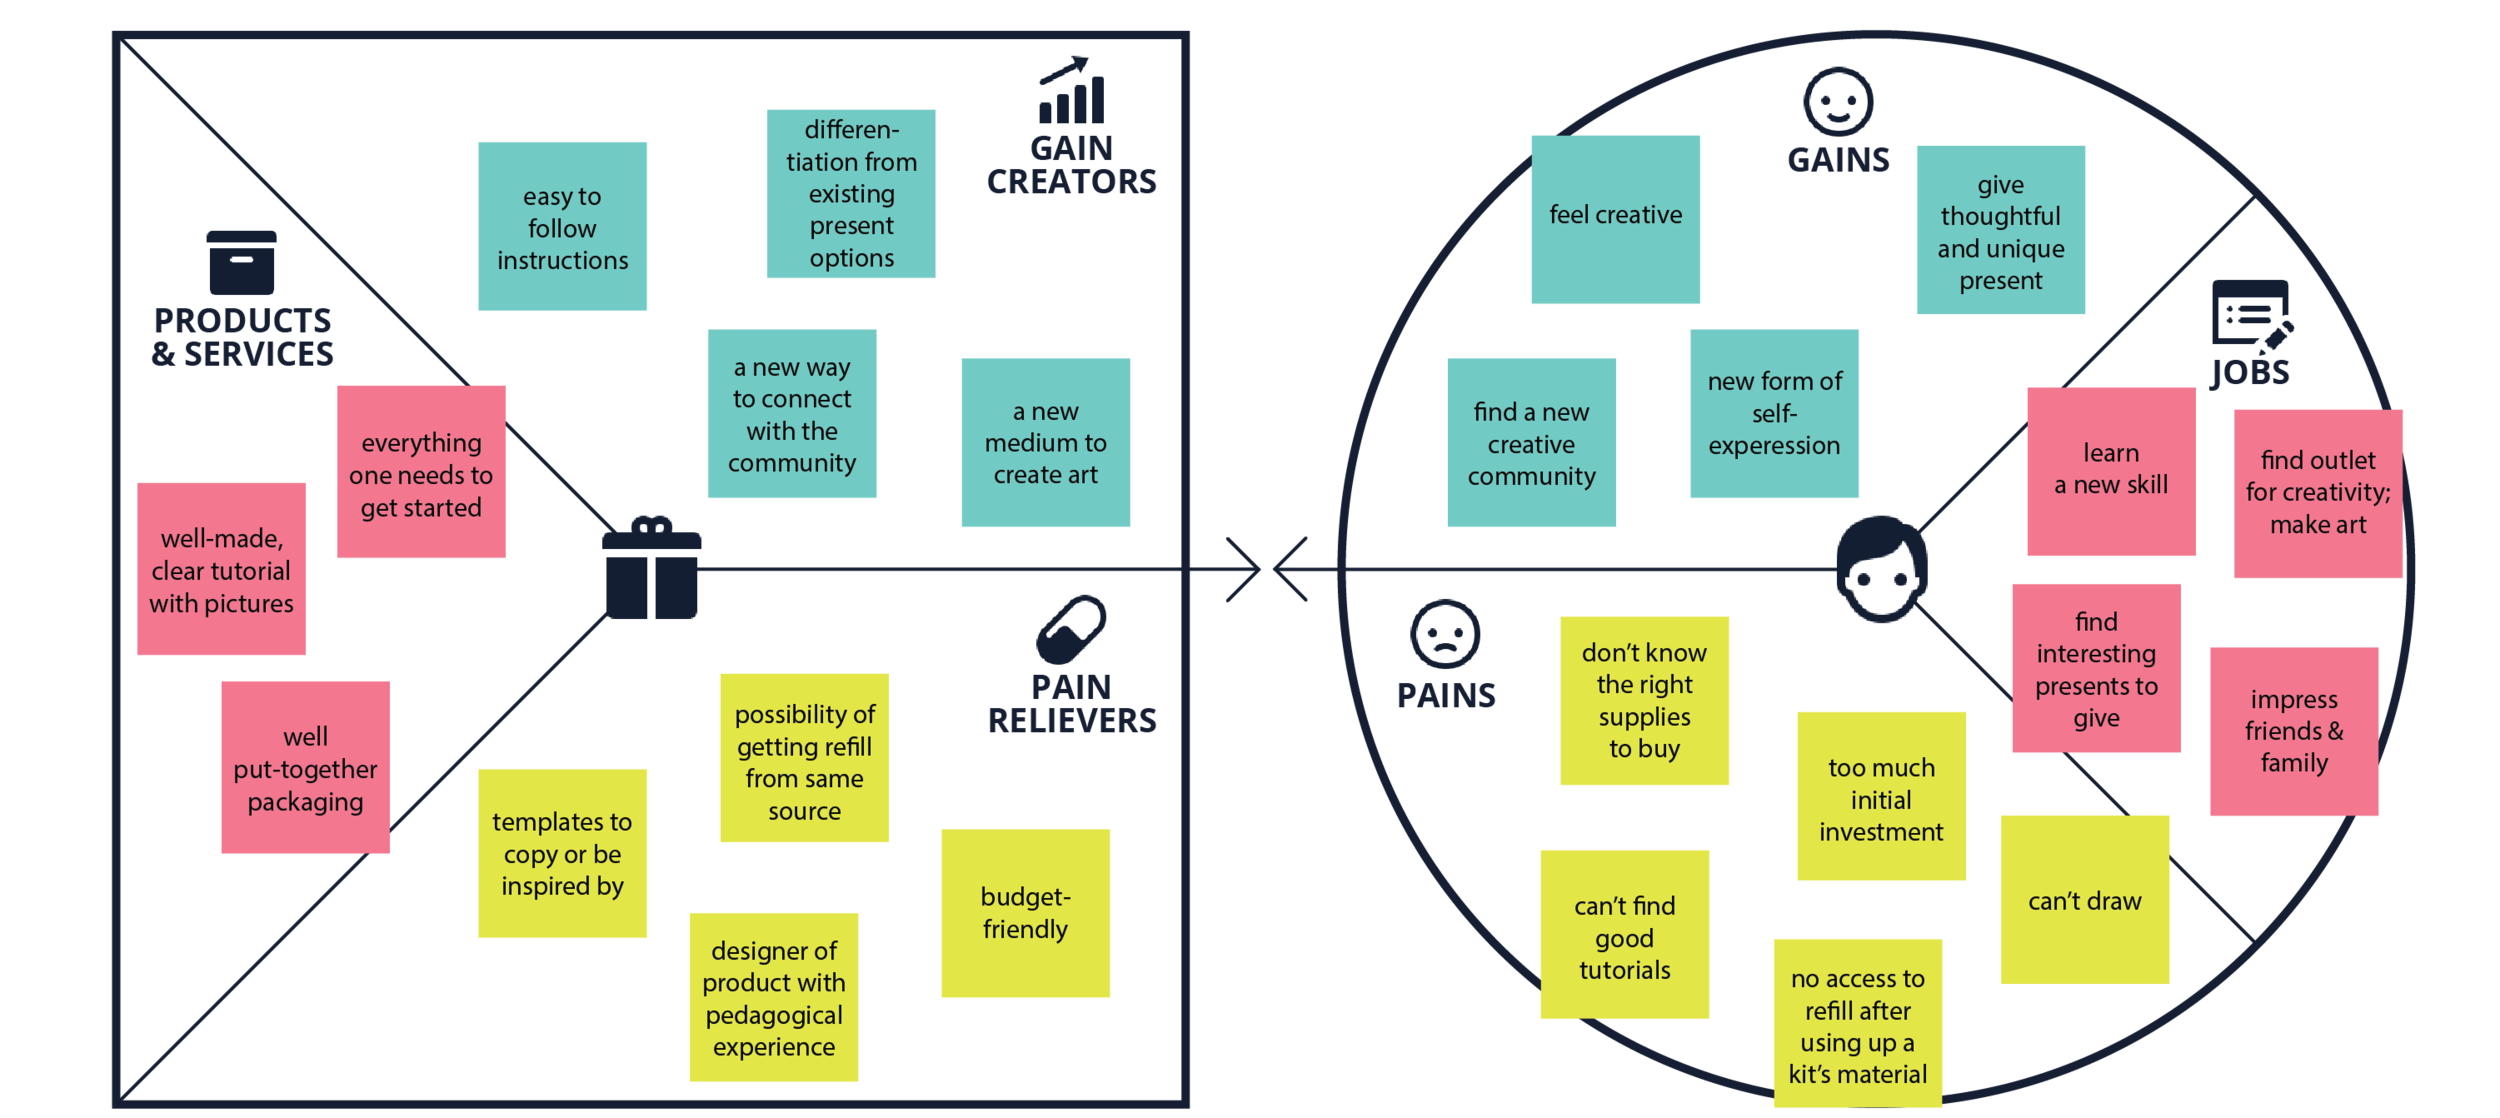
Value Proposition Canvas
To make sure that the end product is positioned with the customer values and needs, I collected comments and feedbacks by reading comments about printmaking supplies under my online content, and talking to participants at my workshops. Based on them I made the value proposition canvas below.
Competitive Research
Since make-it-yourself printmaking kit is a rather niche market, a lot of the competitor products are just slightly different solutions to the same user problem.
To understand the nuanced differences between each solution and product, I looked into the some popular existing kits for both linocut and rubber stamp-making and what they offered. I then synthesized their similarities and differences:

Detailed Concept
I knew that the kit I would put together would be for making rubber stamps, not linocuts because:
the former has a more gentle learning curve with fewer tools needed and easier carving materials to work with,
it offers more possibilities to print on different surfaces, and
it involves carving techniques that would be applicable when the user is ready to move on to more advanced form of relief printmaking, i.e. linocut.
With the research insights in mind, I started making a mind map of what I wanted to include in my stamp kit, also making note of some further decisions that I needed to make during the material sourcing phase.

Sourcing Materials
I started by setting some ground rules: 1) competitive, whole-sale prices to ensure the profit margin, 2) whole kit would have a handmade, rustic look that represents the essence of my personal brand and 3) everything needed to fit nicely together in a compact and sturdy package that did not require additional reinforcement during shipping.
With these in mind, I wrote down a list of detailed criteria for each item for when I researched all options.


Quality Check
Over the course of 3 weeks, I talked to a total of 18 manufacturers and shops and ordered samples of the potential materials, so I could see how everything worked together, and also conduct an initial quality check where I worked with the materials to make sure that they were of high quality and suitable for beginners to use.
Though negotiation, I was able to get not only competitive wholesale prices, but also the possibility to customize products, including getting the carving knives without the manufacturer’s logo, and having the cans laser engraved with my own logo.
In the end of the sourcing phase, I had a list of the exact materials and the amount I would purchase, and I calculated the cost including my own time to decide on the final retail price for my kit; I was happy to have been able to keep it competitive considering a lot of my customers lived in countries where living standards were lower than Sweden.
Tutorial Design
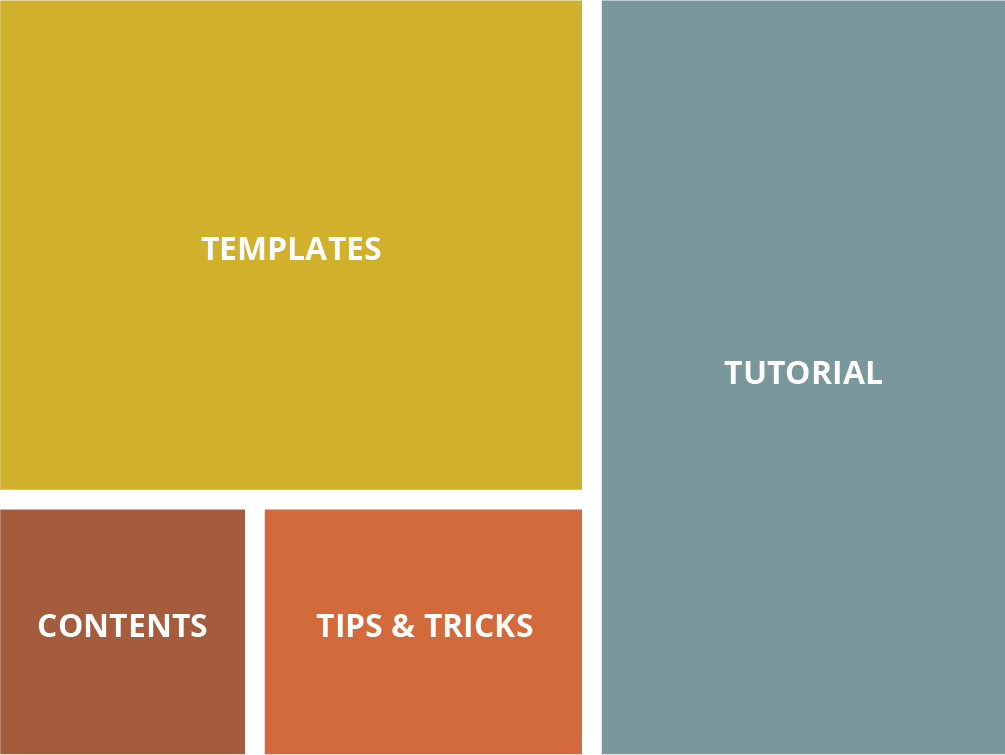
Content
Since I had already decided the contents I wanted to feature on the tutorial page during the product concept phase, I roughly planned how I wanted to layout the page, knowing that this would be an A4 sheet of paper for the ease of printing and a reasonable area for all the information to fit.
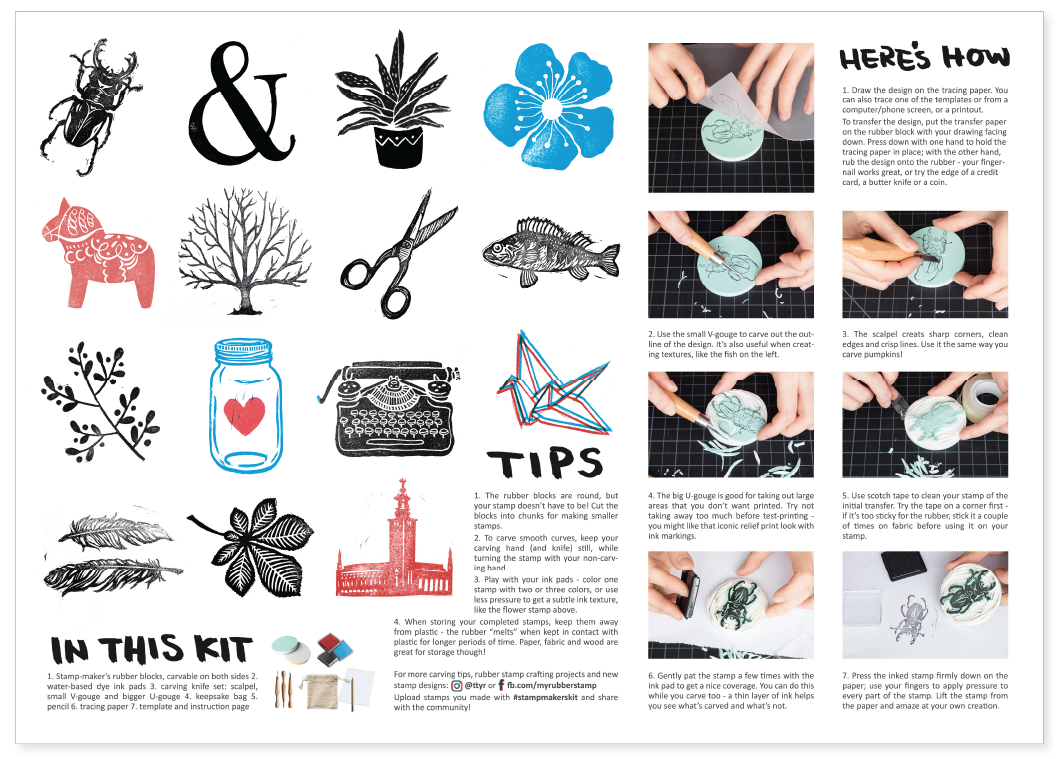
Templates
According to my experience, a lot of people wanted to get into printmaking but worried that they couldn’t draw. To ease them into it, I decided to include a few templates for inspiration; I also made sure that the printed templates would be about the same size as the carving blocks provided, so the user can also trace one of the designs.
These things helped me come up with the template designs:
I kept up-to-date with popular stamp designs and illustration elements on Pinterest, and under related hashtags on Instagram.
I wanted to include some Sweden-themed motifs since it was the place where I lived and where the kit was designed; they would also make the kit be a nice present for people visiting the country.
It was important for me to have templates suitable for all skill levels, as well as to showcase different techniques to use the tools, to ink and to print the stamps.

Some of the templates I created for the kit
Tutorial, UX Writing and Photography
The challenge for the tutorial part seemed straight-forward: both the photos and texts needed to be pedagogical for users of various age groups and skill levels.
My experience in hosting workshops, writing tutorials in blog posts and making process videos on Instagram and Youtube gave me a good grasp from the learner’s perspective what the key steps of the carving process were and how best to demonstrate them.

An earlier photo included in one of my blog posts showcasing my stamp-making process
For the writing part, I took guidance from Letting Go of Words, the book by Janice Redish on UX writing and thought of the text as giving information rather than a technical document. I kept the tone light and conversational, answering questions users might have.
I wrote the step-by-step tutorial first, then set up a tripod to take close-up pictures illustrating the different steps and techniques. I kept the tone light and friendly to be consistent with the visual identity of the kit.

Design & Layout
I optimized the layout for printing on an A4 paper, breaking up and organizing the contents in a way that showed visual hierarchy and was easy to read. I prototypes by printing out samples with my home printer and seeing it in person; I also brought the samples to some of my graphic designer friends for their feedback.
Taking their feedback into consideration, I substituted the more decorative fonts I had used for the titles with my own handwritten font in brush strokes to make the titles pop more and give the kit a more bold, personalized look.
Packaging Design
Engraved can sample from supplier
Name and Logo
I had had the tradition of naming my products in plain language, as what they are, and I kept the tradition for the kit by calling it “Stamp Maker’s Kit”. The simplicity allowed people to immediately know what it was, and by addressing the user as a “stamp maker”, I made agency explicit by making the user as the agent of the action of stamp making.
Since I had already developed the bold, hand-written font for the tutorial page, I kept the visual consistency by using the same font, adding an exclamation mark for more attention and playfulness, and my name in a small, sans-serif font to remind people that this is an independent, personal brand.
I ordered samples from my metal can supplier to see how the logo looked engraved; I was very happy about how it turned out.
Packaging
The Stamp Maker’s Kit is a niche product by a small, personal brand; potential customers might not understand at first sight what it was. For this reason, I decided that a good packaging for it would fulfill these criteria:

I found the subtle texture of the cans very nice and wanted to keep it mostly uncovered, which meant that I would put the packaging design on a transparent sticker.
This turned out to be a bigger challenge than I thought, partly because it would be light colors on top of the background, and I was not sure if the stickers I could order would be opaque enough to make my design really pop.
To get inspiration of ways to communicate the style and personality of the kit, I put together a mood board before creating my own design.

I started sketching to see how I can include the copy and the contents on the packaging. On the left was my initial sketch - I tried a more illustrative style to present the materials in the kit.
I realized, however, that my potential users need more clarity than the illustrations gave, which looked flat and lacked impact.
So I took photos of the materials in this kit, cropped them out and put them against a dark background to see how they looked; their light, bright colors really stood out, so I proceeded to make the design with transparent background, and superimposed the design on a dark, textured background similar to the metal cans so I could have a mock-up of the packaging.
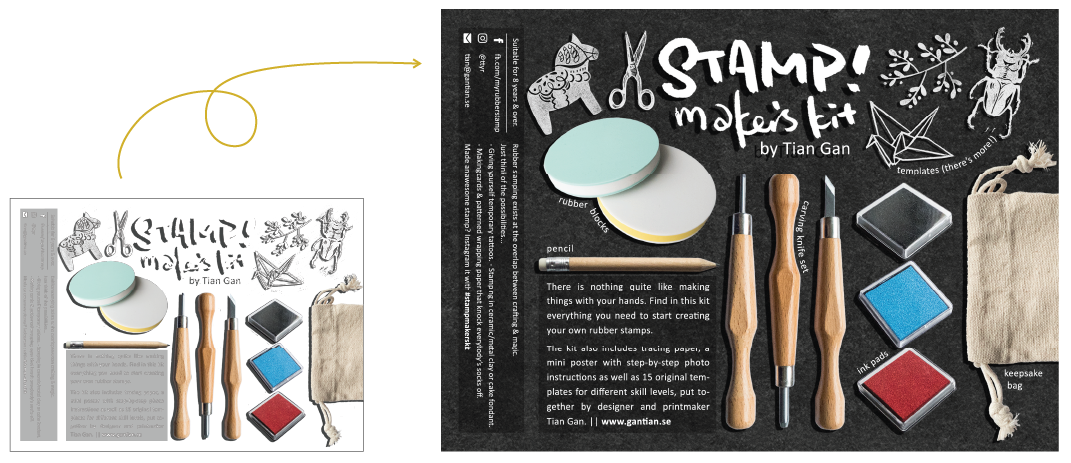
I included some of the templates in the design too, and kept the designs and ink marks and their imperfections for the handmade look. I also added a little drop shadow behind all the graphic elements to make everything pop a bit more.
When I was satisfied with the design, I sent it and the mock-up to the supplier to ask if the stickers could achieve the desired effect. After getting the confirmation, I ordered the transparent vinyl stickers and put them on the cans.

Photo Shoot
Once I got all the materials delivered and have assembled the first kits, I had a photo shoot so I could get photos to use both in the product listing and for potential press.
I aimed for a very simple, home-like setting with bright natural light that is consistent with the feeling of DIY, being organic and handmade that the product brought. Apart from the kit’s packaging, I also wanted to showcase its contents in a flat lay.

Website Launch
Since I already had an online shop then, I launched the Stamp Maker’s Kit there, and made another listing for refills of the rubber blocks in packs of 2, 5 and 10.
Apart from the sales, my Google analytics has revealed that the kit has generated a lot of traffic to my site when people searched for keywords including “DIY kits”, “make your own rubber stamp”.
Workshop & Events
I have sold Stamp Maker’s Kit at my own workshops and various events I attended, including at Affordable Art Fair where I hosted a drop-in stamp-making workshop.
I considered the workshops a great place to introduce the kit to potential customers since I had the opportunity to talk to them face-to-face, and they could also try using the tools and making their own stamps before purchasing the kit.


Over the 2+ years since launch, I sold hundreds of the kit both in person and online, to a dozen different counties. The product also helped me grow my following on social media, and create a community of makers all over the world.
Further Steps
Challenges in Retrospect
When I look back at the process and the product now, there were definitely things that I would have done differently if I was to do it over again.
One thing is to re-design the tutorial page so it’s more reader-friendly, perhaps print on both sides of the paper to allow a less compact layout, and to include more templates and small tips and online resources. I would also include more beginner-level templates to accommodate a wider audience.
I originally designed the kit with grown-ups in mind, but realized later I’m missing out a big group which was families with kids, since I’d heard from quite a few customers that they purchased the kit to use as a family activity with young kids. It would be a good idea to include some tips for this user group.
However, since I have moved my focus from printmaking to UX design, I haven’t had the time to revamp the product or to develop a version 2.0; but I prepare to do that in the future, since this is a product that captures the essence of my personal brand, and I deeply believe in giving people well-designed tools so they have new outlets for their creativity.
Reflection
During the project, I had the rare chance to own every step of the process and to be the one responsible for realizing the vision I had in mind, on top of working on the design side. I was able to work very closely (despite the physical distance) with suppliers as well as to use my experience to understand my customers’ needs.
I think a well-defined, user-centered process really helped me understand users’ needs early on, and also helped me better communicate my vision through design.